Monday, December 22, 2014

Choose Happiness

What do they say?  Nothing new under the sun.  What's old is new again.  Hold onto something long enough, and it will come back in style.  What are some you can think of?  


Remember how stencils used to be all the rage in the 90's? Stencils are back, but now they're called Decorative Masks.  They're still stencils, but much cooler!  

Here, I used Dots & Stripes Decorative Mask with a Sponge Dauber.  Gently tap the ink pad with the dauber, and swipe the ink through the mask onto your cardstock.  
Supplies used:
Choose Happiness Stamp Set
Naturals Ivory Cardstock
Dots & Stripes Decorative Masks
Doilies, White Baker's Twine
Bermuda Bay Ink
Sponge Daubers
Big Shot with the Chalk Talk Framelits

Happy Stamping!
Bye for now, Maria

Saturday, December 13, 2014

December Stamp Club: No Peeking Gift Bag

Is it Happy Holidays or Merry Christmas?  For me, it's Merry Christmas, but I do not like Christmas getting lumped together with Thanksgiving.  I want to celebrate two separate and distinct holidays!!! I'm always so sad when I see people take down their decorations and put the Christmas tree at the curb on December 26th!!  I want to savor the Christmas holiday just a little longer!


December's Club project was this darling little gift bag.  I like to keep plain white and kraft gift bags on hand.  They're neutral for any occasion, and are just begging for decorating!

The DSP is from the Trim the Tree Stack.  No need for cutting.  Just tear a sheet from the stack and attach to the front and back of your gift bag.  

Supplies used:  
Christmas Taggables (check the Clearance Rack section)
Cherry Cobbler Sheer Linen Ribbon, Ink
Whisper White Cardstock, Garden Green Cardstock, Trim the Tree DSP Stack
Label Bracket Punch
Big Shot with Chalk Talk Framelits

Regardless of how you celebrate the holidays this time of year, I want to wish you the merriest of merry for this holiday season and best wishes for 2015!  Bye for now, Maria

Thursday, December 4, 2014

Throwback Thursday: Watercolor Thank You

I'm really "throwing it back" with these cards.  The parchment style cardstock and rainbow ink pads are from years ago--been hoarding them for a looooonnnnnnnggggg time.  Stampin' Up! used to sell the ink pads when I first became a demonstrator.  Today, I dug out a bunch of supplies that have been sitting around literally collecting dust.  


The stamp is called Watercolor Thank You, and is sold all by itself.  

You can do this technique with any of our Classic Ink Pads.   

After stamping, drag an Aqua Painter (filled with water, of course) over the image.  Use enough water to "pull" the color, but not too much you turn the cardstock back into pulp, which is what I usually do because I squeeze the barrel of the aqua painter way too hard--hold my pencil to tight too!!!

On the autumn thank you, I added a dotted outline with a gold paint pen.  I added dots to the blue thank you with a white gel pen, but it's hard to see in the photo.  

To finish the card, I added ribbon, turned up one of the corners, and added a leaf die cut from the Autumn Accents Bigz die.  

Supplies used:
Watercolor Thank You Stamp
Aqua Painter
Big Shot with the Autumn Accents Bigz Die
White Gel Pen
Silver Glimmer Paper
DSP shown on the Autumn card--retired and name unknown

Non-Stampin' Up! supplies used:
Gold Paint Pen
Parchment Cardstock
Rainbow Ink Pads

Get those supplies out.  Try a new technique.  Happy Stamping!  Bye for now, Maria

Thursday, November 27, 2014

Truly Grateful

What are you grateful for?  I'm grateful for so many things, like this stamp set.  I was so glad to see the Truly Grateful stamp set carried into the Annual catalog--the Big Book as I like to call it! 


TIP:  When working with Glimmer Paper, attach using hot glue--because nothing likes to stick to it!

Supplies used:
Truly Grateful Stamp Set
Silver Glimmer Paper,
Basic Gray and Coastal Cabana Ink
Sponge or Sponge Daubers
Label Bracket Punch
Big Shot with Autumn Accents Bigz Die

Wishing you a very Happy Thanksgiving! Bye for now, Maria

Saturday, November 8, 2014

November Stamp Club: Ornamental Pine


Here's November's project.  I love the Ornamental Stamp Set.  It is so realistic and beautiful!  I'm married to a tree guy so it's natural that I would like it.  


For the card you need:
Ornamental Pine Stamp Set
Old Olive (textured used here), Whisper White Cardstock
Old Olive, Real Red, Baked Brown Sugar, Gold Encore Ink
Big Shot with the Top Note
Stampin' Dimensionals

Not sure if you can tell, but the ornament is stamped one additional time on a separate piece of cardstock, cut out, and mounted on top of the original ornament on the Top Note with Stampin' Dimensionals.  And, the Baked Brown Sugar that was used for the pinecones are stamped on scratch paper first and then stamped on the Top Note so they fade into the pine needles.  


For our second project, we created a set of Love Notes.  Love Notes are 3 x 3 mini cards--great for gift enclosures, tags, or little notes you tuck inside lunch boxes of your loved ones.  

You will need:
Tag Talk Stamp Set
Old Olive (textured used here), Whisper White Cardstock
Old Olive Ink
Gold Metallic Baker's Twine
Label Bracket Punch
Stampin' Dimensionals 

Happy Stamping!  Bye for now, Maria

Friday, October 24, 2014

Eat, Drink and Be Scary

Here's a quick Halloween card for ya!  Holiday Invitation Stamp Set includes a stamp where you write in the "where and when" after you stamp it.  But, it doesn't have to be for invitations!  


Supplies used:
Holiday Invitation, Good Greetings (Hostess) Stamp Sets
Old Olive, Naturals White, Pumpkin Pie Cardstock
Pumpkin Pie, Tuxedo Black Memento Ink
Big Shot with Autumn Accents Bigz Die

Happy Halloween!  Bye for now, Maria

Saturday, October 18, 2014

Blended Bloom and Blendabilities

  I've been rubber stamping since 1997, and I've never been much for coloring.  Here's some practice I did with the Blendabilities markers.  This is the first time I've used alcohol markers--really like the Blendabilities--so easy and fun!

Stamps and supplies used:
Blended Bloom Stamp
For All Things Stamp Set
Note Tag Punch
Flower Frenzy Bigz L Die
Night of Navy, Daffodil Delight, Skin Tone Assortment Blendabilities
Night of Navy, Daffodil Delight Ink
Daffodil Delight, Old Olive, Whisper White Cardstock
Stampin' Dimensionals

Do you like to color your stamped images? Happy Stamping!  Happy coloring!  Bye for now, Maria

Saturday, October 11, 2014

October Stamp Club: Seasonally Scattered

It's October, and the fall colors are at their peak here. The season of gratitude is almost here! Although, I think being grateful is something we should be every day.  This technique reminds me of applying ink directly to the rubber stamp with markers.  We made a take out box at convention with this tag.  I love the tag on the front of a card too!


Instructions

1.   Make sure stamp is clean!!!!
2.   Place stamp rubber side up on table
3.   Ink up “thanks” with Crushed Curry ink pad
4.   Sponge daub Cajun Craze ink on the edges of the “thanks” over top of Crushed Curry
5.   Stamp on Very Vanilla cardstock
6.   Punch with Tag Topper Punch
7.   Thread ribbon through hole, add wooden leaf, and tie
8.   Embellish with Glimmer Paper punch outs
9.   Add to front of card as shown
10. Clean Stamp
 Stamps and Supplies:
  • Seasonally Scattered Stamp set (Holiday Catalog p. 43)
  • Crushed Curry, Cajun Craze Ink 
  • Very Vanilla Cardstock, Under the Tree Specialty DSP (Holiday Catalog p. 5), Kraft Cardstock, Glimmer Paper
  • Mossy Meadow Stitched Satin Ribbon
  • Autumn Wooden Elements (Holiday Catalog p. 46)
  • Tag Topper Punch
I am grateful for so many things....God, my husband, family and friends...just to name a few.  Tell someone you're grateful for them!  Send a card to someone you're grateful for--do it today!!  With gratitude, Maria

Wednesday, September 17, 2014

September Stamp Club: For All Things Bookmark


Isn't this little bookmark darling?!  When I saw this in Stampin' Success, the demo only bi-monthly magazine, I knew it had to be our project for stamp club!  The For All Things stamps have a "linen" look to them--instant texture and dimension with adding bulk.  

The leaf that dangles is die cut from Coaster Board, and then inked up with Rose Red and .  The Marina Mist base has been fussy cut with Paper Snips around the Very Vanilla cardstock that was die cut with Apothecary Accents   

Supplies:
For All Things Stamp Set
Rose Red, Crushed Curry, Marina Mist, Soft Suede Ink Pads
Marina Mist, Very Vanilla Cardstock
Antique Brads
Linen Thread
Coaster Board (die cut leaf)
Apothecary Accents, Autumn Accents Big Shot Dies
Sponges

Happy Fall!  Happy Stamping!  Bye for now, Maria


Tuesday, August 12, 2014

August Stamp Club: Choose Happiness Box

During Salabration, SU! had a live stream video where they demoed this box.  It's a box made out of 2 sheets of DSP.  If you a demonstrator reading this, a video for this has been posted on Stampin' Connection under "Events."  Stampin' Connection is an online community only for demos--being a demo does have its perks!  


To create the box you will need two sheets of DSP.

For the Lid:
One sheet of 12 x 12 DSP, score 2" on ALL FOUR SIDES

For the Bottom:
One sheet of DSP, cut to 11 7/8 x 11 7/8
This piece will also be scored at 2" on ALL FOUR SIDES

For the Liner:
Cut a piece of cardstock at 7 7/8 x 7 7/8 (no scoring necessary, ha!)

After you're done cutting and scoring, you will need to cut slits on two opposite ends of your DSP.  DO NOT CUT YOUR CORNERS OFF, OR YOU WILL NOT HAVE A BOX!


Adhere your corners to make box shape.  Add a cardstock liner for added stability. 

Stamps used:  Choose Happiness
Supplies:  Lullaby DSP
Tea Lace Paper Doilies
Whisper White Baker's Twine
Whisper White CS
Ink:  Coastal Cabana, Baked Brown Sugar, Crisp Cantaloupe

Happy Stamping!  Until next time, Maria

Saturday, July 12, 2014

July Stamp Club & June Paper Pumpkin

I loved this month's paper pumpkin kit so much, I decided it would make a great club project.  July's kit is called Pinwheel Party.  The kit came with enough supplies to make 24 Pinwheels.  The only thing I wish about this kit is that it was the kit for May.  Then, I could have used it FOR Memorial Day AND July 4th AND Labor Day.  Paper Pumpkin is available as an auto delivery monthly, or you can purchase individually at any SU! event.  You can go here to sign up You can go here to sign up.

Saturday, June 7, 2014

June Stamp Club: Treat Pouch

In April, I had the opportunity to attend the first ever Catalog Premier.  And, even better than attending the first ever Catalog Premier Event by Stampin' Up! was attending with my downline--I love them!!!  THEY ROCK!!!!  This month's project is a little goodie holder that was demoed at the event.


Using a piece of DSP 4 1/2 x 6 1/2, score at 1", 1 1/2", 2", 4", 4 1/2" and 5".  If you use the DSP paper stacks, the DSP is already 4 1/2 x 6 1/2--no cutting necessary!!!  Moonlight Designer Series Paper Stack used here. 


Tip for scoring:  score your bottom score on the edge that has the Stampin' Up! copyright sign so you won't see it on your completed pouch.  


Cut off part of the bottom to make your tab.  Glue together.  If you glue the flap on the outside of the pouch it will look like those old-timey coin envelopes.  


Create a tag and attach with clothespin to keep pouch closed.


Starburst and Banners Framelits along with the 1 3/8" circle punch are used on the tag.


Stamp set:  Work of Art
Other Supplies used:  
Lost Lagoon, Hello Honey Cardstock and Ink
Whisper White Cardstock
Lost Lagoon 3/8" Stitched Satin Ribbon and Linen Thread
Mini Metallic Clothespins

Happy Stamping!  Bye for now, Maria

Saturday, May 10, 2014

May Stamp Club: Altered Notebooks

It's that time of year again for making notebooks with all the retiring DSP.  I never get tired of making these!


This version we've added a long tag using the Tag Topper Punch, and then wrapped the ribbon around towards the inside of the notebook.  For a finished look, add the inside piece of DSP after adding your ribbon. 


For all the measurements etc, here's the original post.  My cousin just went to a women's retreat, and made personalized journals for all the ladies that were going from her church.  To personalize them, she added a tag punch out, and simply hand wrote their names on the tag.  Everyone loved them.  Here's a few of the ones she made!

Happy Stamping!  Bye for now, Maria

Friday, April 25, 2014

Love My Job--I get paid to stamp all day!!!

I really do love my job as a SU! Demonstrator, but I really don't stamp all day--one can dream, though!!! One perk as a demonstrator is we can earn FREE stamps!!!  And, that includes during Salabration!  As demonstrators, we can earn free stamps for our sales and recruiting efforts.  And,   I was eligible for some extra freebies for promoting to "manager" from my upline this spring.  What an exciting box I received!!!!!


The set with the bird is called Choose Happiness.  It has been my go to stamp set since getting it--very versatile!!!  

How about you?  Would you like a discount on ALL your rubber stamping and paper crafting purchases all the time?  No need to wait for a sale or a coupon!!!  I would love to have you on my team!  Join the fun here.  Happy Creating!  Bye for now, Maria

Saturday, April 12, 2014

April Stamp Club: Tag a Bag Book

For our April's Stamp Club project we made a baggie book, which is literally a few bags folded in half, layered, and tied together with some pretty ribbon.  These aren't just any ordinary lunch sacks or brown paper bags.  They are super cute and come pre-printed with a chevron pattern.  The catalog description says they are "food safe", and that the chevron pattern is an "ombre print"--not seeing the ombre--it just looks like it's been stamped with white paint or white craft ink.  These are actually called "tag a bag gift bags."  That's a long name!


To create a pocket, cut off the sealed end of your bags.    


We've added some sentiments, and left room to add a personal note.  The pocket would fit a gift card or small photograph.


Add some stamped images and punches.  You can stamp directly on the bag, but give it a few minutes to dry so you don't smear the ink.  


These little books would make a really cute mini scrapbook, or gift card holder.  


The Tag a Bag Gift Bags have been carried over from the 2013/2014 catalog into the 2014/2015 catalog.  Check back next month for another great project.  Happy Stamping!  Bye for now, Maria

Stamps & Supplies used:
Peaceful Petals, Petite Petals Stamp Sets
Tag a Bag Gift Bags
Primrose Petals, Midnight Muse, Raspberry Ripple, Summer Starfruit Ink and CS
Primrose Petals, Midnight Muse, Raspberry Ripple Ribbon
Whisper White CS
Petite Petals Punch

Tuesday, March 11, 2014

March Stamp Club: Watercolor Wonder Notecards


The Watercolor Wonder Notecards are already preprinted and prescored. They look like you spent hours and hours water coloring. The envelopes are included. You get 20 notecards for $12.95--that's just 65 cents for one notecard! I love anything that will help me create gorgeous cards with minimal effort. All I did was add a stamp and a few embellishments.  Here I added "hello" from the Four You stamp set. It is a set of four word stamps, hence the name.  In addition to the hello, it has birthday wishes, thank you, and thinking of you.  All good basic phrases for card making!  I also added two butterflies that were punched out, layered together, and embellished with a rhinestone. If you wanted to get a little fancier, you could always add some ribbon.  Happy Watercoloring (wink, wink)!!  Bye for now, Maria

Friday, March 7, 2014

Chalk Label


Framelits can be used for other things besides cardstock like this chalk label using the Labels Framelits Collection.  Add your chalk label to a jar with some ribbon for a great gift.  Of course, if I was giving this as a gift, I would add some candy or chocolate.  Bye for now, Maria

Tuesday, February 25, 2014

Occasions Printer Tray


My printer tray features new products from the Occasions Catalog, and a few things from Salabration and the "Best of Stamps."  


Need a Get Well Card or a Cheer Up Card?  Then, Cheer Up Buttercup from the Geometrical set is perfect for you.  There is a matching Triangle Punch.


The DSP in each rectangle of the tray is from the Fresh Prints Stack.  The Once in a Lifetime You Meet Someone Who Changes Everything stamp is from the See  Ya Later Salabration Set.  Get yours now--Salabration ends March 31st!


You Make Me Happy is from Happy Watercolor. 


This is the Sprial Flower Die--my new favorite!!!  The heart and love stamps are from the Best of Love Stamp Set.  Again, don't wait to get yours--deadline for the "best of stamps" is March as well.  


Here we have a heart from the Language of Love Set along with the Hearts Collection Framelits and some Cherry Cobbler Seam Binding Ribbon.  


For this last one, we have the Petite Pennants Builder Punch, and the Small Heart Punch.  These stamps are also from the Language of Love set.  Bye for now, Maria

Tuesday, February 18, 2014

Salabration Twisty Treats Kit

Here's another Salabration item for you.  It's the Twisty Treats Kit.  It comes with 12 cell bags, 12 twist ties, 12 die-cut tags, and a sheet of glitter hearts (already sticky and die cut too).  These would sure make cute little gifts for friends or co-workers, or party favors.


Don't miss out!  Salabration is only here once a year!  Click here to shop now.
Happy Salabrating!  Bye for now, Maria

Friday, February 14, 2014

Happy Valentine's Day with the Flower Spiral

Happy Valentine's Day!  Here's a bouquet for you that will never wilt!  I showed it to my hubby, and he said, "Good.  Now, I don't need to get you flowers for Valentine's Day!"  He didn't really mean it though.  He always remembers to bring flowers for special occasions and just because too--he's good like that!


This bouquet was made with the new Spiral Flower Originals Die and the Big Shot.  Oh my gosh!!!  I love it!!!!  It is super cool and super easy!!!  All you need is cardstock, floral stems from the craft store, and a container for display.  My container is a sugar shaker from the dollar store.  Happy Creating!  Bye for now, Maria

Sunday, February 9, 2014

Envelope Punch Board

One thing I love to do with my retired DSP hoard is create envelopes!  I think my hand-stamped cards deserve to have equally beautiful outside coverings instead of just a plain, white, yucky envelope. Don't you?  Plus, it gives the mail carries something to look at!  The envelope punch board makes it easy to create envelopes. Tells you all the sizes right on the front of the board. 

Saturday, February 8, 2014

February Stamp Club: Good As Gold & A Treat Holder

When I first became a demonstrator in 1999, there was no Salabration brochure, or 11 different items to pick from--just a one page, black and white flyer, and there was only 4 stamp sets to pick from!  The neat thing SU! did though was color the rubber of the stamps in a different color each year--my first Salabration the rubber was Forest Foliage.  And, there was Pretty in Pink, Lavender Lace, just to name a few.

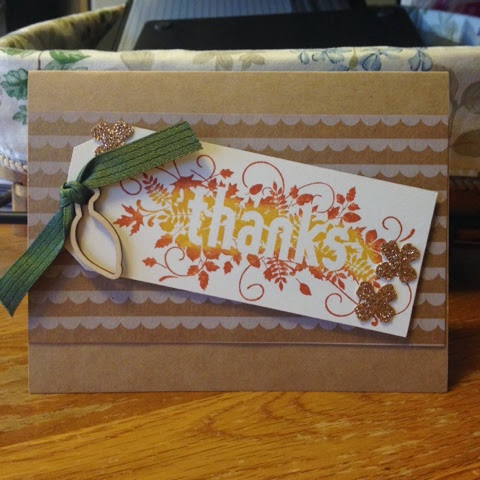
This is the Good as Gold Card Kit--it's a Salabration item!  These were our projects for February Stamp Club. The little treat holder was from a swap I rec'd at Leadership. Isn't it cute?  It uses the new Tag Topper Punch.  I'm so glad to see tags are still in style.  Tags have been popular for as long as I've been stamping. Tags are one of my favorites!  Great accent for the front of a card! 


The Good as Gold Kit is very easy. Just open the pkg, pop out all the die cuts, assemble the cards, and add your ribbon. It even comes with gold envelope liner.  Beautiful!  

The treat holder is also very easy.  You need a 2" wide piece of cardstock to fit in the channel of the Tag Topper Punch.  You can make your tag any length. For this treat holder, cut cardstock to 6 1/4" x 2."  Score at 2 7/8" and 3 3/8."  Any flat candy or chocolate will fit. Here I used York Peppermint Patties. Ghiradeli squares work great too--my fav is the dark chocolate ones with sea salt--yum!!

Supplies used:
Good as Gold Simply Sent Kit
That's The Ticket, Lovely Labels stamp sets
Pink Pirouette, Very Vanilla cardstock, Red and Champagne Glimmer Paper
Tag Topper, Ticket, Full Heart, Banner Punches
Very Vanilla Seam Binding Ribbon
Pool Party, Gold Encore inks

When it comes to Glimmer Paper, I like to hot glue it together--much better hold than anything else I've tried with it. Happy Salabrating!  Bye for now, Maria

Friday, February 7, 2014

My Go To Crafty Tools

I've had a few things break lately--two wheelie suitcases, threadbare jeans, and the washing machine. Right before Christmas too!  I thought if one more thing breaks I am going to bed and bury myself under the covers!  Do you ever have moments like that?  Then, two of my go to crafty tools broke!


Can I have a moment of silence for my hot glue gun?  We had a good run--I had this glue gun for 20 years!  Yes, 20 years!  A funny story about this little glue gun...Heather and I were stamping in my studio one Friday evening.  I was trying to glue together these snowflakes. Well, I couldn't figure out why my glue wasn't working/melting/setting up!  Very frustrating!  Thought I had a bad batch of glue--is there even such a thing?  So, the next day I went out to buy some new glue sticks. Did that work?  NOPE!  So, it was back to the store for me for a new hot glue gun!    


Don't ever take away my Big Shot!  The handle broke the other day. Oh, the horrors!  Leave it to my hubby to take it apart and fix it! He's good like that!  He loves to take things apart, and put them back together--with either an improvement or modification.  Now, I have a Super Big Shot!  What's a Super Big Shot?  I don't know either--he just made that up! 


What are your go to crafty tools?  Wishing you longevity in all your crafting tools!  Happy crafting!  Bye for now, Maria


Thursday, February 6, 2014

Throwback Thursday: Fabric Bag


Are you on Pinterest?  I love Pinterest!  While on Pinterest, I see all these fabulous sewing projects.  So, for today's Throwback Thursday, we have a fabric bag.  It sure was nice to have fabric that coordinated with SU! colors and patterns.  Really gives  your projects that finished, polished look when the packaging matches the gift inside.  I only know some basic sewing, but mom is fabulous, and she does most of the sewing for me.  What are you inspired to create after being on Pinterest?  Happy Sewing!  Bye for now, Maria

There's still fabric on the clearance rack.  Shop anytime www.mariamitsdarfer.stampinup.net  

Thursday, January 23, 2014

Throwback Thursday

Here are some cards I created a while ago, hence Throwback Thursday. All of the DSP is retired, and I no longer remember the name--sorry about that!  It's a pretty basic template. The DSP is a 4 x4 square, which will give you 9 squares per sheet, or 108 squares per pkg.  That's just over 10 cents a square!  Wow--that's a lot of cards!  Then, just add a word or phrase along with an embellishment!  Easy peasy--I'm all about easy, quick, simple but beautiful cards!


Above:  Happy Christmas is from More Merry Messages (Carry Over List), Happy birthday is from Teeny Tiny Wishes

Below:  The Open Sea Stamp Set, Decorative Label Punch


Below: Yippee-Skippee! stamp set, Cupcake Builder punch, Red Glimmer paper for the cherry on top 


I will have to apologize for the "a little something" stamp below.  It has escaped away from the its set/box, and I no longer have the rest.  The heart is from also a retired punch--it has 3 hearts of different shapes/sizes.  

The butterfly and happy birthday in the card below was an old Salabration set--the rubber is in Lavender Lace. Again, I do not know the name of the stamp set as I no longer have the box it came in.  Decorative Label Punch is also used.  


Get out that DSP--don't be afraid to cut into it, and use it!  Happy Stamping!  Bye for now, Maria