Showing posts with label October Stamp Club. Show all posts

Saturday, October 11, 2014

October Stamp Club: Seasonally Scattered

It's October, and the fall colors are at their peak here. The season of gratitude is almost here! Although, I think being grateful is something we should be every day.  This technique reminds me of applying ink directly to the rubber stamp with markers.  We made a take out box at convention with this tag.  I love the tag on the front of a card too!


Instructions

1.   Make sure stamp is clean!!!!
2.   Place stamp rubber side up on table
3.   Ink up “thanks” with Crushed Curry ink pad
4.   Sponge daub Cajun Craze ink on the edges of the “thanks” over top of Crushed Curry
5.   Stamp on Very Vanilla cardstock
6.   Punch with Tag Topper Punch
7.   Thread ribbon through hole, add wooden leaf, and tie
8.   Embellish with Glimmer Paper punch outs
9.   Add to front of card as shown
10. Clean Stamp
 Stamps and Supplies:
  • Seasonally Scattered Stamp set (Holiday Catalog p. 43)
  • Crushed Curry, Cajun Craze Ink 
  • Very Vanilla Cardstock, Under the Tree Specialty DSP (Holiday Catalog p. 5), Kraft Cardstock, Glimmer Paper
  • Mossy Meadow Stitched Satin Ribbon
  • Autumn Wooden Elements (Holiday Catalog p. 46)
  • Tag Topper Punch
I am grateful for so many things....God, my husband, family and friends...just to name a few.  Tell someone you're grateful for them!  Send a card to someone you're grateful for--do it today!!  With gratitude, Maria

Saturday, October 5, 2013

October Stamp Club: Truly Grateful Circle Thinlits Card

For October's Stamp Club we created a flippy card using the Circle Thinlits.  These card dies cut and score your cardstock in one swipe through the Big Shot, and creates a card where the center will flip when you gently pull on the sides of the card.  All the guess work is gone!!  The Thinlits also come with other die such as the scallop circle used here.   


Here's the other side...


Supplies used:
Circle Card Thinlits Die
Truly Grateful Stamp Set (Holiday Catalog)
Very Vanilla CS, Crumb Cake CS, Witches' Brew DSP
Summer Starfruit and Basic Black ink
1 3/4 Circle Punch

Wednesday, October 17, 2012

October Stamp Club: Twisted Card

Once in a while I participate in a swap with my up, up, up, up, up, upline--that's 6 levels up from me.  The group leader is gracious enough to allow me to join in on the swapping fun even though I'm not really in her group.  A little online research led me to a PDF by Robin Messenheimer and a video by Kelly Gettelfinger (see below). 


On the front of my twisted card before I added the DSP, I taped down the front flap so it doesn't have a pocket--I didn't want the flap underneath the DSP to buckle the DSP.  There is a pocket on the inside, which would be great for a gift card, a tea bag, or a Ghirardelli chocolate square.  Of course, you can have a pocket on the outside if you want to.  As a demonstrator, it could be a really cute networking tool with your business card tucked inside--pass out to potential customers.  Now, I do not go into a lot of details about how to make this card.  You're resourceful--you can watch the video below or search for Robin's PDF mentioned above.  So sorry for any inconvenience, but why reinvent the wheel, or card in this case? 


Start with 8 1/2 x 11 piece of cardstock.
Cut in half at 11 x 4 1/4.
(yikes--sorry about the glare!) 


Score corner to corner.


Score in half. 


Cut DSP same way.


Here's the video created by Kelly Gettelfinger.


The Twisted Card is perfect for Halloween.  Happy Stamping!  Bye for now, Maria

Monday, October 10, 2011

October Stamp Club: Gift Card Holder and a Pocket Card

Hi Stampers!  Happy October!  Hope you're enjoying the fall season as much as I am.  I was told recently that the month of October begins the downward slope toward Christmas--yup!  I said it--Christmas!  Like my momma always tells me--it will be Christmas before we know it.  Can't I just really enjoy Fall for a while?!  This month's project we created a Halloween Gift Card Holder and a Pocket Card for fall.  Here's how...

For the Trick or Treat Gift Card Holder, start with a 12 x 5 1/2 sheet of card stock.


I've seen scoring boards/tools on the market, and have been tempted to buy one.  However, I knew if I waited long enough, Stampin' Up! would come out with one of their own.  I'm very excited they've added this to their product line. I"m glad I waited.  Here's why...

The new Simply Scored Scoring Tool makes scoring easier, and can score every 1/8".  A ruler is printed along the top and sides.  A centering ruler is also featured along the top.  It comes with 3 place markers (additional place markers are available).  And, you get a dual ended stylus with metal tips that will glide along your cardstock and has an ergonomic grip.  There is a little storage compartment to hold your extra place markers, the bottom has nonskid feet.  You know you want one!


Score at 4 1/4, 6 1/4 and 7 3/4.


Fold card in half.  Using the "eye-ball" method, punch a divet with 1 1/4" Circle Punch.


With Word Window, punch along side of the half circle.


This is want you want it to look like.  


Place adhesive ONLY along ONE side!!! If you place adhesive on both sides of your punch-outs, you will not be able to insert your gift card.  I speak from experience--lol!


Add a piece of 4 x 5 1/4 piece of DSP from Pick Your Posion.


Insert your gift card. 


Decorate the front with another piece of Pick Your Posion DSP (4 x 5 1/4). Add "Trick or Treat" in Basic Black and the really scary spider stamped with Pumpkin Pie from Piece of Poison stamp set on a scrap of Whisper White. Pumpkin Pie cardstock was used for the card base. 


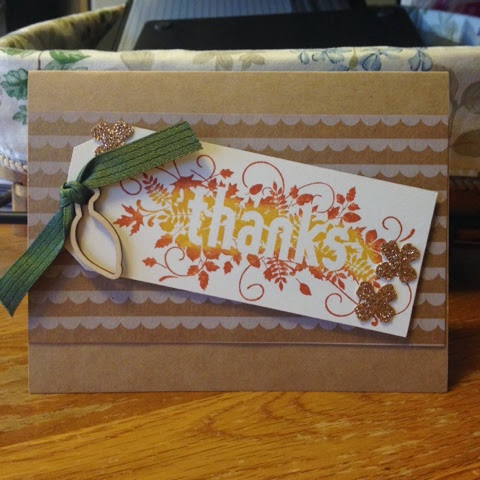
The next project is a pocket card, which can be used to hold a gift card, but it will also hold a tea bag.


Start with your standard size card (Soft Suede, 8 1/2 x 5 1/2, folded in half).  For the pocket, you will need an 8 1/2 x 5 1/2 piece of Spice Cake DSP.  Fold it in half, and open.  Then, fold in both sides like you are making a paper air plane. 


Fold it in half.


Cut off 1/4" from the short end and bottom like the photo below...


Open it back up and add adhesive to same spots where you cut.


Fold up again and attach to the inside of your card.
Add gift card, money, tea bag, hot cocoa or soup packets. 


One sheet of DSP will yield two pockets.  Save the left over piece to embellish the front of your card. 


Stamp "Thinking of You" in Soft Suede from You Are Loved stamped set, and the leaf from Gently Falling in Pool Party on Very Vanilla cardstock. 

Here's a girlie version...


Here's what the Rubber Duckies were busy stamping this month...


Above is another use for the 1x8 Cell Bags from the Holiday Mini--LIP GLOSS!!!


Happy Fall!  Happy Stamping! Bye for now, Maria

Wednesday, October 27, 2010

October Stamp Club

October's Stamp Club card was another card from the Balitmore Regional. 
Supplies used:  Day of Gratitude Stamp Set, Old Olive ink, cardstock, 5/8" grosgrain ribbon; and the Decorative Label Punch.