Sunday, July 22, 2012

Flower Brooch


This set of flower pins is made using the Flower Folds Die for another Fabric Flower Pin Swap at Convention.  For this one, you will only need the 3 largest flowers.  Cut four flowers in each of the three sizes in your desired fabric.  These fabrics came from the fabric store.  Stampin' Up! does sell "designer fabric" in coordinating sets that match the DSP--it is very lovely!  From Stampin' Up! Designer Fabric Project Sheet,  "beginning with the largest flower, fold one flower in half.  Fold a second flower in half and layer over the first flower, overlapping two of the petals.  Glue in place.  Repeat with the thrid and fourth flower, overlapping and gluing as you go, with the last flower overlaping the previous flower and going under the first flower (this is just like folding down the top of a cardboard box with the last flap under the first. Repeat for rest of the flowers.  Add button and ribbon.  Glue pin to back of  brooch."  Gotta love these no sew projects!

Saturday, July 21, 2012

Flower Folds Pin/Bag Tag

I enjoy making flower pins with the Flower Folds die and the Big Shot.  These flowers get zapped with the heat tool in order to shrink them, and curl up the petals.  For this technique to work, you  need to  use synthetic fabric--the cheaper the better.  Not a sewer?  Not a problem!  I know how to sew, but I still need a lot of guidance while I'm sitting at the machine (thanks, Mom--she's good like that!).  So, I'm all about anything I can cut out with the Big Shot, and glue together.


You will need all four flowers for one pin.  All four flowers will layer togegther to make a beautiful flower.  I turned mine into pins, but they make great bag tags or look great on the front of a card.  After cutting out the fabric, you will want to zap each flower layer with the heat tool.  This will shrink the fabric and curl the petals.  The fabric tends to blow and flop around as the air from the heat tool hits it.  I hold it in place with a "clip on a stick"--just don't touch the metal part--ouch!!


The heat tool really reduces the size. 


Layer the flower togther with hot glue--no sewing for me!


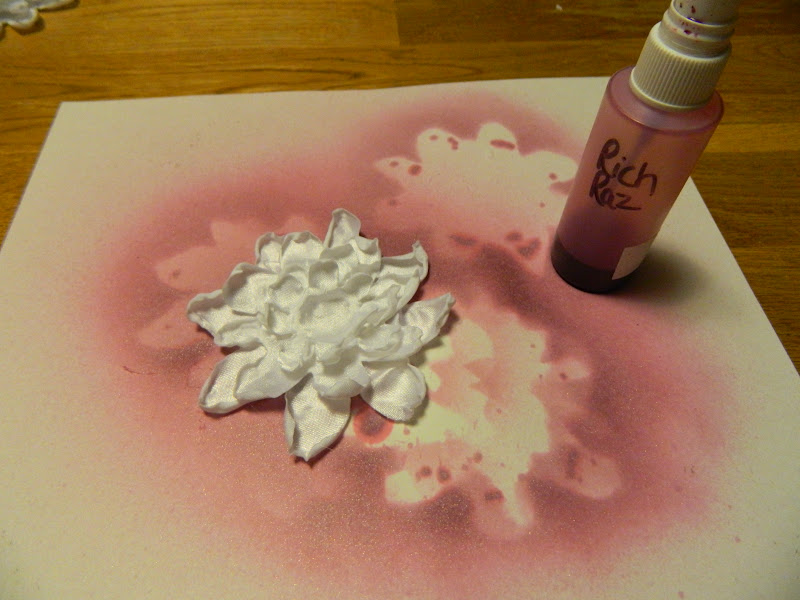
Now, for the fun and messy part....make your own shimmer spritz with rubbing alcohol, Shimmer Paint, drops of ink refills in an empty hairspray bottle (Stampin' Up! now sells these really cool Spriter Bottles).  Shake well and spray.  The more drops of ink you use and the more you spritz, the more concentrated the color will be.  Allow to dry. Make sure you protect your work surface. 


Look at those awesome shimmery flowers!  Ink Refills used:  Rich Razzleberry, Melon Mambo, Wisteria Wonder, Calypso Coral, Lucky Limeade, Pool Party, Elegant Eggplant, Island Indigo
On a few of them, I sprayed them with two different colors for a two-toned effect--turned out very cool!


Oh, my goodness...look at my hands!


Add a button and ribbon or thread to the center for a finished look.  To thread ribbon cut the end of the ribbon thin enough to thread through button hole.  Tie in knot.  Hot glue to front of flower.   Finish by hot gluing a pin on the back.  Add clip or key chain for bag tag.


They hold up pretty well...the one above is on one of my Vera totes that I cart around everywhere including SLC to Convention!!!!  If I wanted to "seal" the edges, I could just zap it with the heat tool again. 


This bunch of 6 pink pins  (Melon Mambo) are for a Fabric Flower Pin swap at convention and for general 3D swaps.  Don't wear pins, they make great bag tags.  Or, glue a magnet to the back and display them on the frig.  Happy Creating!  Bye for now, Maria

Friday, July 20, 2012

Postage Due

Here's my card for Lyssa's Convention Quality Swap.


When I first saw the new Postage Due stamp set, I thought of old timey, vintage things.  So, I thought it would be fun to rip the edges of the stamp image.   Ripping paper--it goes against everything you learned in grade school, but it's so fun!!! 


After ripping around the entire image, sponge edges.  Sponging = more fun!!
Sorry for the bad lighting--I was burning the midnight oil--no natural light to be found.


Stamp "postage stamps", punch out and sponge edges.


Supplies used:  Framed Tulips Embossing Folder, Soft Suede ink and cardstock, Very Vanilla cardstock, Crumb Cake seam binding ribbon, Stampin' Dimensionals, Stampin' Sponges, Postage Stamp Punch, Postage Due stamp set

Papaya Collage


Here's my second card for Lyssa's Convention Quality Swap.  I really enjoyed being in this swap.  Lyssa's swaps are truly just phenonmenal!!!  For some reason, I'm drawn to vintage and collage style stamps.  I don't know why...maybe it reminds me of my grandmothers...my, how I wish I could have a conversation with one of them again.  I chose Summer Starfruit for this card because I like a challenge.  When this color was revealed by Stampin' Up!, no one liked it (at least not my customers).  So, what's a good demonstrator to do?  Well, make my customers fall in love with it, of course!  So, I've been using it like crazy.  I picked Elegant Eggplant to go with Summer Starfruit directly from the Color Coach.  If you are not confident about choosing colors, I highly recommned getting the Color Coach!!!  It takes the guess work out of picking colors.  The Summer Starfruit background was embossed with the Vintage Wallpaper Embossing folder.  Before I ran it through the Big Shot, I stamped it with the leaf image in Papaya Collage, but it doesn't really show up in the picture!  The roses are stamped in Elegant Eggplant, and then ripped out.  The frame is stamped in Summer Starfruit--again, ripped out--I needed to "rip" out a lot of anger--I was having issues, lol!  Happy Creating!  Bye for now, Maria

Thursday, July 19, 2012

Never Ending Folding Card

At Convention, we can participate in card swaps--this is one of the most exciting parts of the event! 
I participated in the 2012 WOW swap--organized by someone on Splitcoaststampers.  The WOW swap has to be a full card that utilizes a technique or fancy fold.  My card is a Never Ending Folding card.  You can just keep opening and opening and opening it.  For Stampin' Up! Demonstrators, you can find a video done by Brian Pillings on the demonstrator website under the February 2011 online extras. 


You will need two pieces of cardstock 2 3/4 x 4 1/4 (scored at 1 1/16 on both ends), two pieces of cardstock 2 1/8 x 5 1/2 (scored at 1 3/8 on both ends), DSP cut to 2 1/2 x 1 7/8 (4 to 8 pieces per card). 


Lay out your pieces in this manner, and add sticky strip like this...


Peel up red liner on sticky strip and place one long strip on top of short wide piece like this...


Add second long piece...


Flip it over, and add second short wide piece...


I found that if I lined up the score lines, my cards opened must easier. 
Your card should be able to open and open and open and open....


Decorate with DSP and stamp.  To add shimmer to the butterfly punch out, add rubbing alcohol and Platinum Shimmer Paint to Stampin' Spritzer.  Shake well and spritz as desired on carstock.  Allow to dry.  Punch out and add to front of card.  Want a custom colored shimmer spritz?  Add drops from an ink refill bottle to the rubbing alcohol and shimmer paint. 


Supplies:  Wisteria Wonder cardstock and ink, First Edition DSP, Elegant Eggplant cardstock and ink, Elegant Butterfly Punch, Stampin' Spritz, Platinum Shimmer Paint, Rubbing Alcohol, Papillon Potpourri stamp set

If you're stopping by because you were also part of the WOW swap, let me know by leaving a comment.  Thanks!  Bye for now, Maria

Sunday, July 15, 2012

Saturday, July 14, 2012

June Stamp Club: Explosion Card

Since I enjoyed creating explosion cards so much (see previous post), I thought it would make a great stamp club project for June.  This version is much smaller, but just as wonderful!


Start with a 6" square piece of cardstock. You can get four cards from a 12x12 piece of cardstock, but you probably already knew that!  Score it at 3" on both sides and diagonally just once.  The cover is made with two 3" squares of cardstock and one piece of 2 3/4" squared piece of Very Vanilla.  You will need two 2 3/4" square pieces of DSP cut in half on the diagonal to decorate the inside. 
   

Add DSP to the inside--alternate that pattern--show off that DSP!!!  Stamp, sponge and embellish as desired.  Fold up.  Attach ribbon with Sticky Strip.  Add covers.

Supplies used:  Very Vanilla cardstock, Calypso Coral Cardstock, ink, ruffled ribbon and DSP from the In Color DSP Stack, Chocolate Chip ink, Stampin' Sponge, Sticky Strip, and Blooming with Kindness Stamp set (this set  is sooooooo beautiful!!!).

Until next month, Maria