Showing posts with label April Stamp Club. Show all posts

Saturday, April 4, 2015

April Stamp Club: You Are Amazing

Here's our card for April Stamp Club...

I never get tired of flowers or flower stamps.  They are ALL so wonderful--both flowers and flower stamps.  I'm glad to see SU! has added texture onto the rubber image of these stamps--make me an instant artist--wink, wink!!!  You are Amazingly Amazing is from the Painted Petals Stamp Set. The whole Painted Petals suite is just so beautiful!!!  The Painted Blooms DSP (not shown in this post) was hand-drawn and water colored by someone who works at the home office (SU! said so at Leadership).  And, both go nicely with the Spring Flowers Embossing Folder.  

Supplies:
Painted Petals Stamp Set
Spring Flowers Embossing Folder
Banners Framelits
Naturals White (card base), Whisper White (for the banner), Elegant Eggplant Cardstock
Soft Sky, Elegant Eggplant Ink
Bermuda Bay Sequin Trim (remove sequins from thread, apply with Liquid Glue)
White Baker's Twine
Stampin' Dimensionals, Tombo Multipurpose Liquid Glue

Thanks for stopping by!  Bye for now, Maria

Saturday, April 12, 2014

April Stamp Club: Tag a Bag Book

For our April's Stamp Club project we made a baggie book, which is literally a few bags folded in half, layered, and tied together with some pretty ribbon.  These aren't just any ordinary lunch sacks or brown paper bags.  They are super cute and come pre-printed with a chevron pattern.  The catalog description says they are "food safe", and that the chevron pattern is an "ombre print"--not seeing the ombre--it just looks like it's been stamped with white paint or white craft ink.  These are actually called "tag a bag gift bags."  That's a long name!


To create a pocket, cut off the sealed end of your bags.    


We've added some sentiments, and left room to add a personal note.  The pocket would fit a gift card or small photograph.


Add some stamped images and punches.  You can stamp directly on the bag, but give it a few minutes to dry so you don't smear the ink.  


These little books would make a really cute mini scrapbook, or gift card holder.  


The Tag a Bag Gift Bags have been carried over from the 2013/2014 catalog into the 2014/2015 catalog.  Check back next month for another great project.  Happy Stamping!  Bye for now, Maria

Stamps & Supplies used:
Peaceful Petals, Petite Petals Stamp Sets
Tag a Bag Gift Bags
Primrose Petals, Midnight Muse, Raspberry Ripple, Summer Starfruit Ink and CS
Primrose Petals, Midnight Muse, Raspberry Ripple Ribbon
Whisper White CS
Petite Petals Punch

Tuesday, May 7, 2013

All Occasion Notecard Set

I love this "Peace on Earth" card.  I received this card in a swap from Mary Bergere at Stampin ' Up! several years ago.  I love the simplicity of it, and think it would be a great card for any occasion. 


Just by changing the cardstock and ink colors, it gives the card a whole different look.  We made the following set of all occasion notecards for April's Stamp Club project. 


Bravo Burgundy, Lucky Limeade, Regal Rose, Pretty in Pink cardstock and ink.


Certainly Celery, Lucky Limeade, River Rock cardstock and ink.


Bashful Blue, Not Quite Navy, Baja Breeze, Lucky Limeade cardstock and ink.


River Rock, More Mustard, Lucky Limeade, Certainly Celery cardstock and ink.
Stamp Set:  Perfectly Penned
Accessories:  Bird Builder Punch, Stampin' Dimensionals, Woodgrain Embossing Folder

Tuesday, April 17, 2012

April Stamp Club: Side Notes

Inspiration for this month's club project came directly from the Occasions Mini Catalog (p. 22).


 Here I've used Side Notes to stamp a sentiment on, and then placed it on the front of a card rather than using it for journaling.  
These are beautiful for a card front!


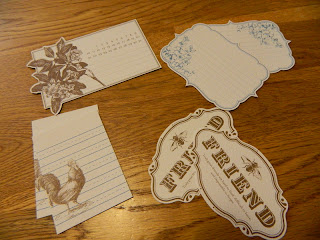
There is 24 total side notes (two of each design).
They come pre-cut and pre-printed.
Beau Chateau shown here.


You will also need a Soft Suede card base that has been embossed with Vintage Wallpaper embossing folder, two strips of Beau Chateau DSP (5 1/2 x 1 3/4 and 5 1/2 x 1/2), two scallop circles of DSP, and a Side Note.


Place strips of DSP across the center of cardbase. 
Stamp Side Note as desired.  Place scallop circle behind the side notes.
Add ribbon, small flower punches (Itty Bitty Punch Pack) and rhinestones.


 Attic Boutique Side Notes & DSP 


 Happy Stamping! Bye for now, Maria

Wednesday, April 20, 2011

April Stamp Club

Happy Easter to all the Rubber Duckies on the Delaware!!!  For those that were at April's stamp club, Sheila had these delicious duckie cookeis for us.  They were so good!! Almost too pretty to eat--ha, ha!  Who am I kidding?  I couldn't resist!  Thank you, Sheila!  You Rock!  The cookies come from a local baker here in Delaware called Snack Bakery. 


Here's our project this month.  It uses the new stamp set Four Phrases and the new DSP Paisley Prints that will be in the NEW IDEA BOOK!  If you can't wait 'til the new Idea Book comes out,  you can purchase these wonderful products during the month of April after a $20 qualifying purchase.  I must thank Sharon, my fantabulous upline, for demoing this card at our monthly meeting.  THANK YOU, SHARON!!!!


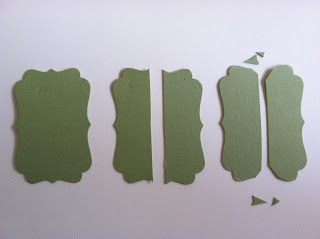
To make the background, take a punch out Pear Pizzaz cardstock with Decorative Label Punch and cut it in half.  Cut the little corners off.  Adhere to the back of your stamped and punched out image.  


For the scallop square, start with a 3x3 piece of card.  With the Dotted Scallop Ribbon Border, punch once on all four sides  using the "eye ball" method.


Cut out DSP with the Top Note.  
Use the "frame" from the Top Note. 


Add Crumb Cake Seam Binding Ribbon and assemble card. 


Cardstock and ink are Pear Pizzaz and Baja Breeze on Very Vanilla.  Also ending in April is the Occasions Mini Catalog.  Here's the one we stamped at my upline's meeting...

Happy Easter, Happy Stamping!  Bye for now, Maria