Wednesday, March 11, 2015

March Stamp Club: Berry Basket


It's almost spring!  Yeh!  
Here's a cute Spring or Easter Basket for March's Stamp Club.


This is the Berry Basket Die


You need two of the large rectangles and 3 strips.
Two strips to go around the basket.
One strip for the handle.


I used the stripes and polka dots from Painted Petals to stamp on my basket.


Fold up on the score lines and glue together.


I stapled the handle on using the Mini Stapler


Attach the two strips together--these will go around the top of the basket.


Staple around the top of your basket.


To make Spring Grass or Easter Grass for your basket, use your Fringe Scissors.


Crumble up to make it fluffy.


Stamps and Supplies used:
Painted Petals Stamp Set
Daffodil Delight, Real Red, Wild Wasabi Ink
Daffodil Delight, Wild Wasabi, Whisper White Cardstock
Painted Blooms Cotton Twine
Note Tag Punch
Berry Basket Bigz L Die
Handheld Stapler
Fringe Scissors

Happy Spring!!! Happy Easter!!!  Happy Stamping!!  Bye for now, Maria

Saturday, February 14, 2015

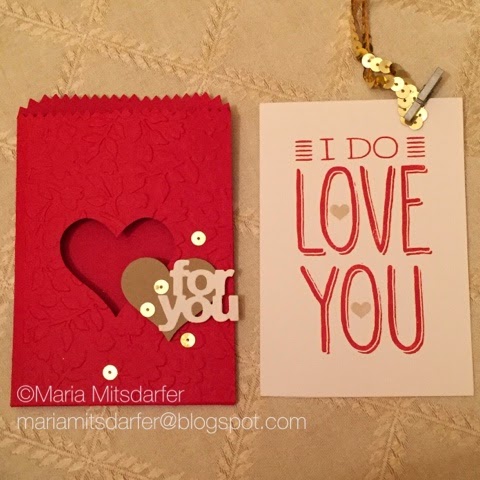
February Stamp Club: Mini Treat Bag Thinlits

Hope you had a nice Valentine's Day!  This month's stamp club project was a lovey one since it was held on Valentine's Day.  


The Big on You Stamp images are large and are designed to fill the front of a card.

Both the "for you" and heart window are from the Mini Treat Bag Thinlits set.  


Stamps sets: 
Big on You, Another Thank You (little heart image)

Supplies used:
Mini Treat Bag Thinlits Dies
Spring Flowers Embossing Folder
Real Red, Whisper White (5 x 3 3/8), Crumb Cake Card stock
Real Red, Crumb Cake Ink
Sweetheart Punch
Gold Sequin Trim
Mini Metallic Clothespins
Sticky Strip and Multipurpose Liquid Glue


Some people LOVE Valentine's Day--some people HATE Valentine's Day.  Whichever camp you're in, we should show love and gratitude to everyone everyday!  Happy Valentine's Day!  Happy Stamping!  Bye for now, Maria

Tuesday, January 27, 2015

January Stamp Club: Mosaics Photo Tuturial

Happy New Year!  Happy New Stamp Club!  We are doing the Mosaic Technique for this month's club project.  


You need something to stick all your "strips" down with.  Here I've used 8 1/2 x 11 White Shipping Labels from Staples.  You can you use Xyron adhesive or even carpet tape.  Carpet Tape can be found in the hardware store, comes in varying widths, and is double sided.  

If you use Xyron adhesive, roll a sheet of thin printer paper through the Xyron machine.  Use the sticky side for this project.  


The shipping labels come in 8 1/2 x 11 sheets.


To make it easier to work with, I cut the sheet in half.


Peel the backing paper off.
Place the shipping label sticky side up.


Gather your strips.  These could be DSP you cut up just for this purpose.  Or, it can be left over pieces of DSP that you been saving.  You know--all those pieces of DSP you've been saving FOREVER just in case!  

All the things you stamp, and they just do not come out the way  you envisioned--do not throw them away.  Save them to cut up for this project.  When those "boo-boos" are cut into little strips, you will never see the mistakes.  


Place your strips on the sticky paper in a diagonal pattern.  


Once your sticky paper is covered, cut to card size.


Card sizes:
8 1/2 x 5 1/2 folded in half.
Middle layer is 5 1/4 x 4
Mosaic layer is 5 x 3 3/4.


Add to the front of your card, and embellish as desired.  


Supplies used:
Tag Talk Stamp Set
Chocolate Chip Cardstock and Ink
Rhinestones
Bracket Label Punch
Naturals White Cardstock
Various strips of DSP (all retired)

Get out those scraps and left over pieces of DSP.  Save those mess ups for the Mosaic technique. Happy Creating!  Bye for now, Maria

Monday, December 22, 2014

Choose Happiness

What do they say?  Nothing new under the sun.  What's old is new again.  Hold onto something long enough, and it will come back in style.  What are some you can think of?  


Remember how stencils used to be all the rage in the 90's? Stencils are back, but now they're called Decorative Masks.  They're still stencils, but much cooler!  

Here, I used Dots & Stripes Decorative Mask with a Sponge Dauber.  Gently tap the ink pad with the dauber, and swipe the ink through the mask onto your cardstock.  
Supplies used:
Choose Happiness Stamp Set
Naturals Ivory Cardstock
Dots & Stripes Decorative Masks
Doilies, White Baker's Twine
Bermuda Bay Ink
Sponge Daubers
Big Shot with the Chalk Talk Framelits

Happy Stamping!
Bye for now, Maria

Saturday, December 13, 2014

December Stamp Club: No Peeking Gift Bag

Is it Happy Holidays or Merry Christmas?  For me, it's Merry Christmas, but I do not like Christmas getting lumped together with Thanksgiving.  I want to celebrate two separate and distinct holidays!!! I'm always so sad when I see people take down their decorations and put the Christmas tree at the curb on December 26th!!  I want to savor the Christmas holiday just a little longer!


December's Club project was this darling little gift bag.  I like to keep plain white and kraft gift bags on hand.  They're neutral for any occasion, and are just begging for decorating!

The DSP is from the Trim the Tree Stack.  No need for cutting.  Just tear a sheet from the stack and attach to the front and back of your gift bag.  

Supplies used:  
Christmas Taggables (check the Clearance Rack section)
Cherry Cobbler Sheer Linen Ribbon, Ink
Whisper White Cardstock, Garden Green Cardstock, Trim the Tree DSP Stack
Label Bracket Punch
Big Shot with Chalk Talk Framelits

Regardless of how you celebrate the holidays this time of year, I want to wish you the merriest of merry for this holiday season and best wishes for 2015!  Bye for now, Maria

Thursday, December 4, 2014

Throwback Thursday: Watercolor Thank You

I'm really "throwing it back" with these cards.  The parchment style cardstock and rainbow ink pads are from years ago--been hoarding them for a looooonnnnnnnggggg time.  Stampin' Up! used to sell the ink pads when I first became a demonstrator.  Today, I dug out a bunch of supplies that have been sitting around literally collecting dust.  


The stamp is called Watercolor Thank You, and is sold all by itself.  

You can do this technique with any of our Classic Ink Pads.   

After stamping, drag an Aqua Painter (filled with water, of course) over the image.  Use enough water to "pull" the color, but not too much you turn the cardstock back into pulp, which is what I usually do because I squeeze the barrel of the aqua painter way too hard--hold my pencil to tight too!!!

On the autumn thank you, I added a dotted outline with a gold paint pen.  I added dots to the blue thank you with a white gel pen, but it's hard to see in the photo.  

To finish the card, I added ribbon, turned up one of the corners, and added a leaf die cut from the Autumn Accents Bigz die.  

Supplies used:
Watercolor Thank You Stamp
Aqua Painter
Big Shot with the Autumn Accents Bigz Die
White Gel Pen
Silver Glimmer Paper
DSP shown on the Autumn card--retired and name unknown

Non-Stampin' Up! supplies used:
Gold Paint Pen
Parchment Cardstock
Rainbow Ink Pads

Get those supplies out.  Try a new technique.  Happy Stamping!  Bye for now, Maria

Thursday, November 27, 2014

Truly Grateful

What are you grateful for?  I'm grateful for so many things, like this stamp set.  I was so glad to see the Truly Grateful stamp set carried into the Annual catalog--the Big Book as I like to call it! 


TIP:  When working with Glimmer Paper, attach using hot glue--because nothing likes to stick to it!

Supplies used:
Truly Grateful Stamp Set
Silver Glimmer Paper,
Basic Gray and Coastal Cabana Ink
Sponge or Sponge Daubers
Label Bracket Punch
Big Shot with Autumn Accents Bigz Die

Wishing you a very Happy Thanksgiving! Bye for now, Maria
Saturday, November 8, 2014

November Stamp Club: Ornamental Pine


Here's November's project.  I love the Ornamental Stamp Set.  It is so realistic and beautiful!  I'm married to a tree guy so it's natural that I would like it.  


For the card you need:
Ornamental Pine Stamp Set
Old Olive (textured used here), Whisper White Cardstock
Old Olive, Real Red, Baked Brown Sugar, Gold Encore Ink
Big Shot with the Top Note
Stampin' Dimensionals

Not sure if you can tell, but the ornament is stamped one additional time on a separate piece of cardstock, cut out, and mounted on top of the original ornament on the Top Note with Stampin' Dimensionals.  And, the Baked Brown Sugar that was used for the pinecones are stamped on scratch paper first and then stamped on the Top Note so they fade into the pine needles.  


For our second project, we created a set of Love Notes.  Love Notes are 3 x 3 mini cards--great for gift enclosures, tags, or little notes you tuck inside lunch boxes of your loved ones.  

You will need:
Tag Talk Stamp Set
Old Olive (textured used here), Whisper White Cardstock
Old Olive Ink
Gold Metallic Baker's Twine
Label Bracket Punch
Stampin' Dimensionals 

Happy Stamping!  Bye for now, Maria

Friday, October 24, 2014

Eat, Drink and Be Scary

Here's a quick Halloween card for ya!  Holiday Invitation Stamp Set includes a stamp where you write in the "where and when" after you stamp it.  But, it doesn't have to be for invitations!  


Supplies used:
Holiday Invitation, Good Greetings (Hostess) Stamp Sets
Old Olive, Naturals White, Pumpkin Pie Cardstock
Pumpkin Pie, Tuxedo Black Memento Ink
Big Shot with Autumn Accents Bigz Die

Happy Halloween!  Bye for now, Maria

Saturday, October 18, 2014

Blended Bloom and Blendabilities

  I've been rubber stamping since 1997, and I've never been much for coloring.  Here's some practice I did with the Blendabilities markers.  This is the first time I've used alcohol markers--really like the Blendabilities--so easy and fun!

Stamps and supplies used:
Blended Bloom Stamp
For All Things Stamp Set
Note Tag Punch
Flower Frenzy Bigz L Die
Night of Navy, Daffodil Delight, Skin Tone Assortment Blendabilities
Night of Navy, Daffodil Delight Ink
Daffodil Delight, Old Olive, Whisper White Cardstock
Stampin' Dimensionals

Do you like to color your stamped images? Happy Stamping!  Happy coloring!  Bye for now, Maria

Saturday, October 11, 2014

October Stamp Club: Seasonally Scattered

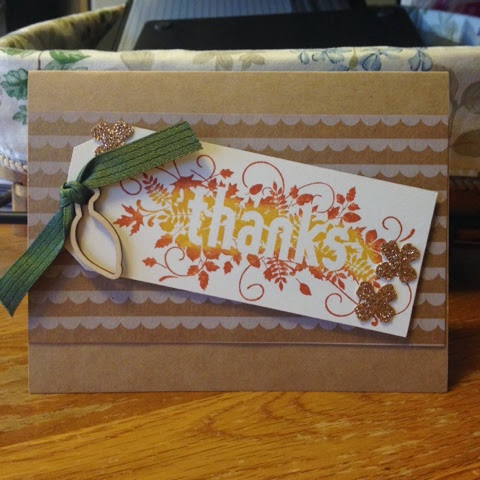
It's October, and the fall colors are at their peak here. The season of gratitude is almost here! Although, I think being grateful is something we should be every day.  This technique reminds me of applying ink directly to the rubber stamp with markers.  We made a take out box at convention with this tag.  I love the tag on the front of a card too!


Instructions

1.   Make sure stamp is clean!!!!
2.   Place stamp rubber side up on table
3.   Ink up “thanks” with Crushed Curry ink pad
4.   Sponge daub Cajun Craze ink on the edges of the “thanks” over top of Crushed Curry
5.   Stamp on Very Vanilla cardstock
6.   Punch with Tag Topper Punch
7.   Thread ribbon through hole, add wooden leaf, and tie
8.   Embellish with Glimmer Paper punch outs
9.   Add to front of card as shown
10. Clean Stamp
 Stamps and Supplies:
  • Seasonally Scattered Stamp set (Holiday Catalog p. 43)
  • Crushed Curry, Cajun Craze Ink 
  • Very Vanilla Cardstock, Under the Tree Specialty DSP (Holiday Catalog p. 5), Kraft Cardstock, Glimmer Paper
  • Mossy Meadow Stitched Satin Ribbon
  • Autumn Wooden Elements (Holiday Catalog p. 46)
  • Tag Topper Punch
I am grateful for so many things....God, my husband, family and friends...just to name a few.  Tell someone you're grateful for them!  Send a card to someone you're grateful for--do it today!!  With gratitude, Maria

Wednesday, September 17, 2014

September Stamp Club: For All Things Bookmark


Isn't this little bookmark darling?!  When I saw this in Stampin' Success, the demo only bi-monthly magazine, I knew it had to be our project for stamp club!  The For All Things stamps have a "linen" look to them--instant texture and dimension with adding bulk.  

The leaf that dangles is die cut from Coaster Board, and then inked up with Rose Red and .  The Marina Mist base has been fussy cut with Paper Snips around the Very Vanilla cardstock that was die cut with Apothecary Accents   

Supplies:
For All Things Stamp Set
Rose Red, Crushed Curry, Marina Mist, Soft Suede Ink Pads
Marina Mist, Very Vanilla Cardstock
Antique Brads
Linen Thread
Coaster Board (die cut leaf)
Apothecary Accents, Autumn Accents Big Shot Dies
Sponges

Happy Fall!  Happy Stamping!  Bye for now, Maria


Tuesday, August 12, 2014

August Stamp Club: Choose Happiness Box

During Salabration, SU! had a live stream video where they demoed this box.  It's a box made out of 2 sheets of DSP.  If you a demonstrator reading this, a video for this has been posted on Stampin' Connection under "Events."  Stampin' Connection is an online community only for demos--being a demo does have its perks!  


To create the box you will need two sheets of DSP.

For the Lid:
One sheet of 12 x 12 DSP, score 2" on ALL FOUR SIDES

For the Bottom:
One sheet of DSP, cut to 11 7/8 x 11 7/8
This piece will also be scored at 2" on ALL FOUR SIDES

For the Liner:
Cut a piece of cardstock at 7 7/8 x 7 7/8 (no scoring necessary, ha!)

After you're done cutting and scoring, you will need to cut slits on two opposite ends of your DSP.  DO NOT CUT YOUR CORNERS OFF, OR YOU WILL NOT HAVE A BOX!


Adhere your corners to make box shape.  Add a cardstock liner for added stability. 

Stamps used:  Choose Happiness
Supplies:  Lullaby DSP
Tea Lace Paper Doilies
Whisper White Baker's Twine
Whisper White CS
Ink:  Coastal Cabana, Baked Brown Sugar, Crisp Cantaloupe

Happy Stamping!  Until next time, Maria