Sunday, September 16, 2012

Emboss Resist Part 2


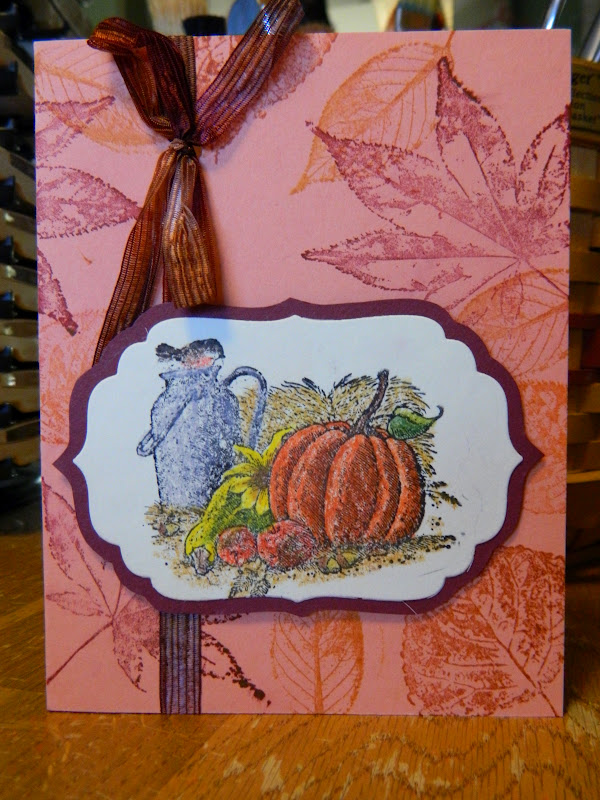
This card also uses the emboss resist technique.  The only difference between this card and the one from September's Stamp Club is the Early Espresso Core'dinations Cardstock, which has a lighter core than other cardstock.  When the raised image is sanded the lighter core is revealed. 


After sanding, you will want to remove the fuzz balls with the Dust Buddy.


Saturday, September 15, 2012

September Stamp Club: Emboss Resist


The technique for September's stamp club project is called emboss resist.  Emboss the image with clear embossing powder. Then, apply ink by sponging or brayering ink onto the cardstock.  Lightly buff the embossed image with a tissue to remove any excess ink. 


Or, you could use Natural Composition DSP--it is already clear embossed.  How's that for a time saver?   First, die cut the DSP with the Autumn Accents Bigz Die.  Sponge with More Mustard and Cherry Cobbler ink working light to dark.  "Hello" comes from Lacy & Lovely.  Other supplies used on this card:  Decorative Label Punch, Woodgrain embossing folder, Early Espresso Cardstock and Ink, Crumb Cake Cardstock.  Happy Stamping!  Bye for now, Maria

Friday, September 14, 2012

September Stamp Club Swaps

A few items from our monthly swap....


To make this adorable little envelope that holds a gift card, Tina says start with a 4 1/2" piece of DSP.   Using the Simply Scoring Tool with the Diagonal Plate, score at 2 5/8 on two opposite ends, and at 1 5/8 on the on the other two opposite ends. Fold sides in, fold bottom up, and cut point off top.  Glue bottom edges up to the sides.  Fold flap down, and round with corner rounder.


Add velcro rounds to secure gift card inside.


Pam made this lovely notecard with the Snow Festival Designer Printed Tags and Festival of Prints DSP Stack.  The stack is 48 sheets of 4 1/2 x 6 1/2 double sided DSP.  Cut a sheet in half and it makes the perfect layering piece for a Notecard.  The tags leave plenty of room to stamp your favorite sentiment.


Now, this card may look like it was made out of a paper bag, but I assure you it wasn't.  It was made from the brown packing material that comes in our Stampin' Up! orders.  It was ironed to flatten out the crinkles and then stamped and embellished like a  normal piece of cardstock--this is called upcycling not recycling!


Marcia created this adorable little bunny card.


Joan created this wonderful fall card.


Susan created this tea bag holder. 
This is the treat holder from August 3, 2012 post.


Until next month...happy stamping!  Bye for now, Maria

Saturday, August 11, 2012

August Stamp Club: Flip Card

I received a "flip" card at Convention...definetly wanted to try it out...so here's our project for this month's club project.


Cut cardstock to 7 1/2 x 4 1/4
Score at 2 3/4 and 3 3/4

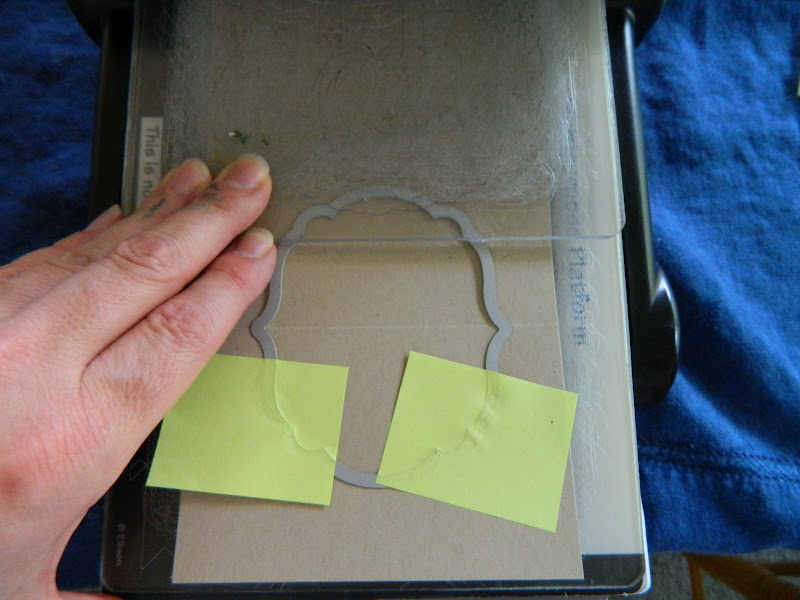
Using Tab 2, place the Labels Framelit on the 2 3/4 crease (a sticky note can be used to hold framelit in place).  Place the Cutting Plate on top, but only up to the crease, and then run through the Big Shot.  Without lifting the Framelit, flip your card around and place the Cutting Plate on the 3 3/4 crease. 
This is what it should look like....

Crease and fold...stamp...embellish.


Happy Stamping! Bye for now, Maria

August Stamp Club Swaps

Card Swaps from August Stamp Club


Punch a butterfly out of the front of a card...use to decorate the inside!


Friday, August 3, 2012

Treat Holder


At Convention, Stampin' Up! had a Demo Resource Center where we got to look at, touch, and try out some of the new products.  This little treat holder was shown with the Simply Scored Tool, and is similiar to the Tea Bag and Cookie Holder we made in March (see previous post).  However, it lays flat rather than standing upright, and is even easier to make.  It will hold a tea bag or a Ghirardelli chocolate square.  


You will need a 6x6 piece of DSP.  Using the Simply Scored Tool with the Diagonal Plate, score down the center diagonally. 


Score at 2" on both ends opposite of the center score (this would be perpendicular to the center score line).

Fold up and crease all your scores with a bone folder. 

Holding the two flaps together at the top, punch holes.
Thread with ribbon to hold closed.


Add a piece of cardstock (2 1/2 x 3) with rounded corners.  Stamp as you wish, and add your treats. 


Wednesday, August 1, 2012

Convention 2012


Here we are at Stampin' Up's headquarters in Riverton, Utah.
Just a short bus ride from Salt Lake City.
Stampin' Up made all the arrangements for demonstrators to tour their facilities.
We were able to visit the corporate office and distribution center. 
The building, and its surroundings, is beautiful.
I would move to Utah if I could work at Stampin' Up.


We had so much fun, learned lots of new things about rubber stamping and how to run our business--another thing I love about Stampin' Up--you're in business for yourself as an Independent Demonstrator, but you're never alone in your business.  They share so many ideas and techniques so you can be successful.  How about you?  Do you have fun on your job?  Are your corporate events something to look forward to each year?  Are they fun?  I really do love my job as a Stampin' Up Demonstrator!  If you need a little fun, or creativity, in your life, you should consider becoming a demonstrator.  I would be honored to have you on my team.  You can get started for less than $100.  
And...we walked, and walked....alot!  And, I was informed I'm a fast walker--who knew?!  At convention there is so much to see and do--I was just trying to get in as much as possible!  Happy Stamping!  Bye for now, Maria

Sunday, July 22, 2012

Flower Brooch


This set of flower pins is made using the Flower Folds Die for another Fabric Flower Pin Swap at Convention.  For this one, you will only need the 3 largest flowers.  Cut four flowers in each of the three sizes in your desired fabric.  These fabrics came from the fabric store.  Stampin' Up! does sell "designer fabric" in coordinating sets that match the DSP--it is very lovely!  From Stampin' Up! Designer Fabric Project Sheet,  "beginning with the largest flower, fold one flower in half.  Fold a second flower in half and layer over the first flower, overlapping two of the petals.  Glue in place.  Repeat with the thrid and fourth flower, overlapping and gluing as you go, with the last flower overlaping the previous flower and going under the first flower (this is just like folding down the top of a cardboard box with the last flap under the first. Repeat for rest of the flowers.  Add button and ribbon.  Glue pin to back of  brooch."  Gotta love these no sew projects!