Showing posts with label Convention. Show all posts

Saturday, July 20, 2013

Convention Quality Swap (CQS)

Lyssa's Convention Quality Swap is my favorite swap I have ever participated in!  The cards are always absolutely beautiful!  Lots of criteria, but it makes for a great swap, and it really does help me do my best work since the focus is on quality NOT quantity!


Supplies:
Label Love, Artisan Label Punch
Backyard Basics Stamp Set and coordinating Framelits
Strawberry Slush, Pistachio Pudding Cardstock and Ink
Chevron Embossing Folder
Fun Flowers Die and cheap satin fabric shrunk with a heat tool
Simply Pressed Clay and Molds
Stampin' Spritzer and Isopropyl Alcohol
Sponge Daubers

Convention 2013: Over the Top Tags Group 3

I've always loved tags, either gift tags or as an accent on a card. First organized swap I participated in at convention this year was the Over the Top Tags Swap (Group 3 & 4). Over the Top means they had to be at certain size, embellished, layered, and/or spritzed. I enjoyed stamping for this swap a great deal. Each group was limited to 8 swappers--makes it easy to keep the quality top notch.


Card stock is cut to 6 x 8 1/2
Scored at 2 3/4, 5 1/2 and 
Create a belly band to hold your tag together

Supplies:
Backyard Basics Stamp Set and coordinating Framelits
Crumb Cake, Very Vanilla CS
Baked Brown Sugar, Pistachio Pudding, Strawberry Slush, Coastal Cabana Ink
Primrose Petals, Very Vanilla Seam Binding Ribbon
Stamping Dimensionals, Stampin' Sponges

Convention 2013: Over the Top Tags Group 4

Here's my swap for the Over the Top Tag from Group 4.


The size layers are 6 1/2 x 3 1/2, 6 1/4 x 3 1/4 and 6 x 3
Supplies:
Clockworks, Really Good Greetings Stamp Sets
Simply Pressed Clay & Molds
Dazzling Diamonds Glitter (sprinkle into mold before adding clay)
Fun Flower Die and satin fabric (the cheaper the better)
Organdy Ribbon
Very Vanilla CS
Venetian Romance DSP
Pistachio Pudding, Indigo Island, CRISP Cantaloupe Ink 
Spritzer with Pistachio Pudding Ink Refill and Isopropyl Alcohol (70%)--it's very light and might not show up on screen, but it's on there

Friday, July 19, 2013

Convention 2013 Very Vintage Swap

Shelli (CEO of SU!) is fond of a "vintage" look.  Her stamped work is always so beautiful!  Here's my idea of vintage for the Very Vintage Swap.

Supplies:
Creative Elements Stamp Set
Very Vintage Buttons, Linen Thread
Tea Lace Paper Doilies
Very Vanilla, Early Espresso CS, Soho Subway  DSP
Woodgrain Embossing Folder (I used this because the lines on the DSP reminded me of the texture)
Fun Flowers Die with cheap satin fabric 
CRISP Cantaloupe, Early Espresso Ink
Label Love, Artisan Label Punch
Sponge Daubers

Wednesday, July 17, 2013

Convention 2013 3D Swap: Satin Fun Flowers

3D swaps are cool. They are anything besides a card or a scrapbook page. Think pins, tags, boxes, candy holders, notebooks, etc.

I love making these layered satin flowers with the Fun Flowers Die.  You shrink the fabric with your heat tool, glue several layers together, and use to make pins, etc. or to embellish stuff.   They're extremely versatile--great for the front of a card, magnet, pin or bag tag.  You'll see a lot of these on my convention swaps. 

Making a spritz is easy. Add 70 percent isopropyl alcohol  to a Spritzer bottle. Drop in Ink from a refill bottle. The more drops, the darker the intensity. Lighter colors will take more ink. I probably spritzed the Pistachio Pudding flowers  3 or 4 times to get the color the way I wanted it.


The centers of the satin flowers were flowers made from the Simply Pressed Clay and the silicone molds.  They were so easy to make.  I got about 140 flowers from one pack.  Half of my clay flowers have glitter on them--just sprinkle Dazzling Diamonds glitter inside the mold before adding the clay.


Supplies:
Satin Fabric (the cheap stuff), Heat Tool, Hot Glue
Fun Flowers Bigz L Die
Buttons & Blossoms Simply Pressed Molds and Clay
Dazzling Diamonds Glitter
Coastal Cabana, Crisp Cantaloupe, Pistachio Pudding Ink Refills
Stampin' Spritzers, Isopropyl Alcohol (70%)
Pin backs, pin tacks, magnets, key chains etc.

I made ALOT of flowers for my convention swaps. My Big Shot really got a workout.  How do you know when you need new cutting plates?  When you crack the plates!!!!  How many passes can one set of plates take?  I don't know, but these were my original plates, and I'm sure it was hundreds if not thousands of passes through the Big Shot!  It was loud, and I thought I broke my machine.  Bye for now, Maria


Tuesday, July 16, 2013

Convention 2013 Salt Lake City

Here's my swap tote full of cards, tags, pins, 3D items just waiting to be traded for other equally nice items. Card swapping/trading is one of the hi lights of Convention for me--it's exciting to swap ideas and be around other demos who are equally as excited about stamping as you are! I like every part of trading--planning, creating, and trading!  It's the sharing part of the hobby that makes it so much fun!  If I have an idea and you have an idea--we each have just ONE idea. But, if we share our idea with each other, then we have TWO ideas (or 6000--that's how many people will be in SLC this year!).  Two, ideas are better than one!  No, I'm not making thousands of swaps--is that even possible!?  The bag is from Thirty One--it's one of their organizing totes.  Stayed tuned to see what's inside--I will be posting my convention swaps during the week.  Bye for now, Maria

Thursday, July 11, 2013

Wildflower Meadows

Organized swaps are all over the place at Convention--and they're great!  Don't get me wrong--I love them.  But, nothing is exciting as general swaps--swapping on the floor of the main stage at convention.  General swaps just mean no theme, and you can make as many as you want--as long as everything is current Stampin' Up! merchandise, of course!  For my general swaps I used Wildflower Meadow background stamp and the coordinating embossing folder--love that!  Love anything that makes creating cards easier and more beautiful to boot!  I used my left over satin flowers too. 


Supplies:
Wildflower Meadow and coordinating embossing folder
Label Love and Artisan Punch
Fun Flowers Bigz L Die and satin fabric, shrunk with heat tool
Simply Pressed Clay and Mold
Pistachio Pudding, Coastal Cabana, Strawberry Slush Ink and Cardstock

Saturday, October 13, 2012

Make and Take Redo

The top photo was a convention make and take pouch. I like the flower made out of fabric and stuck on a skewer for a stem, but not really sure what you're suppossed to do with the pouch. I like practical/useful stamped items. The bottom photo is how I re-made the pouch into a card. I like my version much better. I added Midnight Muse, Daffodil Delight, and Primrose Petals to Natural Composistion DSP with a sponge to make the embossed image "pop!"

Friday, August 3, 2012

Treat Holder


At Convention, Stampin' Up! had a Demo Resource Center where we got to look at, touch, and try out some of the new products.  This little treat holder was shown with the Simply Scored Tool, and is similiar to the Tea Bag and Cookie Holder we made in March (see previous post).  However, it lays flat rather than standing upright, and is even easier to make.  It will hold a tea bag or a Ghirardelli chocolate square.  


You will need a 6x6 piece of DSP.  Using the Simply Scored Tool with the Diagonal Plate, score down the center diagonally. 


Score at 2" on both ends opposite of the center score (this would be perpendicular to the center score line).

Fold up and crease all your scores with a bone folder. 

Holding the two flaps together at the top, punch holes.
Thread with ribbon to hold closed.


Add a piece of cardstock (2 1/2 x 3) with rounded corners.  Stamp as you wish, and add your treats. 


Wednesday, August 1, 2012

Convention 2012


Here we are at Stampin' Up's headquarters in Riverton, Utah.
Just a short bus ride from Salt Lake City.
Stampin' Up made all the arrangements for demonstrators to tour their facilities.
We were able to visit the corporate office and distribution center. 
The building, and its surroundings, is beautiful.
I would move to Utah if I could work at Stampin' Up.


We had so much fun, learned lots of new things about rubber stamping and how to run our business--another thing I love about Stampin' Up--you're in business for yourself as an Independent Demonstrator, but you're never alone in your business.  They share so many ideas and techniques so you can be successful.  How about you?  Do you have fun on your job?  Are your corporate events something to look forward to each year?  Are they fun?  I really do love my job as a Stampin' Up Demonstrator!  If you need a little fun, or creativity, in your life, you should consider becoming a demonstrator.  I would be honored to have you on my team.  You can get started for less than $100.  
And...we walked, and walked....alot!  And, I was informed I'm a fast walker--who knew?!  At convention there is so much to see and do--I was just trying to get in as much as possible!  Happy Stamping!  Bye for now, Maria

Sunday, July 22, 2012

Flower Brooch


This set of flower pins is made using the Flower Folds Die for another Fabric Flower Pin Swap at Convention.  For this one, you will only need the 3 largest flowers.  Cut four flowers in each of the three sizes in your desired fabric.  These fabrics came from the fabric store.  Stampin' Up! does sell "designer fabric" in coordinating sets that match the DSP--it is very lovely!  From Stampin' Up! Designer Fabric Project Sheet,  "beginning with the largest flower, fold one flower in half.  Fold a second flower in half and layer over the first flower, overlapping two of the petals.  Glue in place.  Repeat with the thrid and fourth flower, overlapping and gluing as you go, with the last flower overlaping the previous flower and going under the first flower (this is just like folding down the top of a cardboard box with the last flap under the first. Repeat for rest of the flowers.  Add button and ribbon.  Glue pin to back of  brooch."  Gotta love these no sew projects!

Friday, July 20, 2012

Postage Due

Here's my card for Lyssa's Convention Quality Swap.


When I first saw the new Postage Due stamp set, I thought of old timey, vintage things.  So, I thought it would be fun to rip the edges of the stamp image.   Ripping paper--it goes against everything you learned in grade school, but it's so fun!!! 


After ripping around the entire image, sponge edges.  Sponging = more fun!!
Sorry for the bad lighting--I was burning the midnight oil--no natural light to be found.


Stamp "postage stamps", punch out and sponge edges.


Supplies used:  Framed Tulips Embossing Folder, Soft Suede ink and cardstock, Very Vanilla cardstock, Crumb Cake seam binding ribbon, Stampin' Dimensionals, Stampin' Sponges, Postage Stamp Punch, Postage Due stamp set

Papaya Collage


Here's my second card for Lyssa's Convention Quality Swap.  I really enjoyed being in this swap.  Lyssa's swaps are truly just phenonmenal!!!  For some reason, I'm drawn to vintage and collage style stamps.  I don't know why...maybe it reminds me of my grandmothers...my, how I wish I could have a conversation with one of them again.  I chose Summer Starfruit for this card because I like a challenge.  When this color was revealed by Stampin' Up!, no one liked it (at least not my customers).  So, what's a good demonstrator to do?  Well, make my customers fall in love with it, of course!  So, I've been using it like crazy.  I picked Elegant Eggplant to go with Summer Starfruit directly from the Color Coach.  If you are not confident about choosing colors, I highly recommned getting the Color Coach!!!  It takes the guess work out of picking colors.  The Summer Starfruit background was embossed with the Vintage Wallpaper Embossing folder.  Before I ran it through the Big Shot, I stamped it with the leaf image in Papaya Collage, but it doesn't really show up in the picture!  The roses are stamped in Elegant Eggplant, and then ripped out.  The frame is stamped in Summer Starfruit--again, ripped out--I needed to "rip" out a lot of anger--I was having issues, lol!  Happy Creating!  Bye for now, Maria

Thursday, July 19, 2012

Never Ending Folding Card

At Convention, we can participate in card swaps--this is one of the most exciting parts of the event! 
I participated in the 2012 WOW swap--organized by someone on Splitcoaststampers.  The WOW swap has to be a full card that utilizes a technique or fancy fold.  My card is a Never Ending Folding card.  You can just keep opening and opening and opening it.  For Stampin' Up! Demonstrators, you can find a video done by Brian Pillings on the demonstrator website under the February 2011 online extras. 


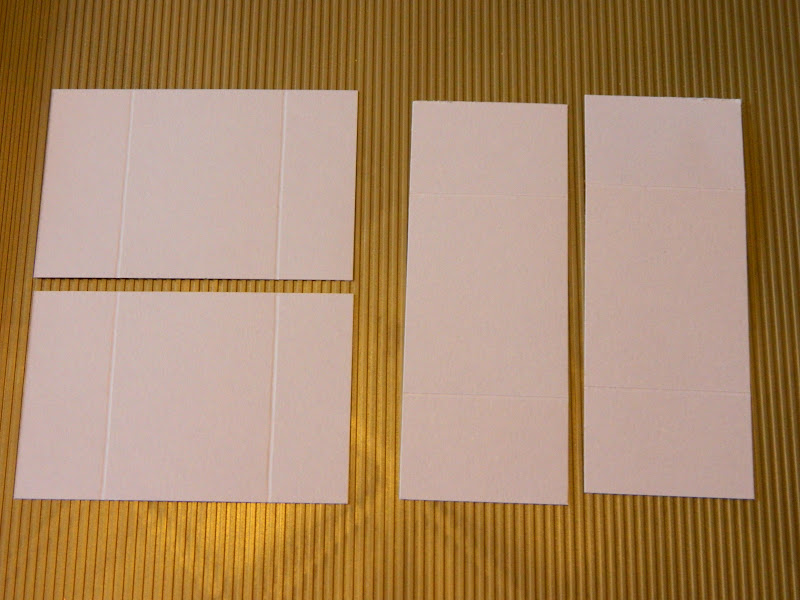
You will need two pieces of cardstock 2 3/4 x 4 1/4 (scored at 1 1/16 on both ends), two pieces of cardstock 2 1/8 x 5 1/2 (scored at 1 3/8 on both ends), DSP cut to 2 1/2 x 1 7/8 (4 to 8 pieces per card). 


Lay out your pieces in this manner, and add sticky strip like this...


Peel up red liner on sticky strip and place one long strip on top of short wide piece like this...


Add second long piece...


Flip it over, and add second short wide piece...


I found that if I lined up the score lines, my cards opened must easier. 
Your card should be able to open and open and open and open....


Decorate with DSP and stamp.  To add shimmer to the butterfly punch out, add rubbing alcohol and Platinum Shimmer Paint to Stampin' Spritzer.  Shake well and spritz as desired on carstock.  Allow to dry.  Punch out and add to front of card.  Want a custom colored shimmer spritz?  Add drops from an ink refill bottle to the rubbing alcohol and shimmer paint. 


Supplies:  Wisteria Wonder cardstock and ink, First Edition DSP, Elegant Eggplant cardstock and ink, Elegant Butterfly Punch, Stampin' Spritz, Platinum Shimmer Paint, Rubbing Alcohol, Papillon Potpourri stamp set

If you're stopping by because you were also part of the WOW swap, let me know by leaving a comment.  Thanks!  Bye for now, Maria