Showing posts with label November Stamp Club. Show all posts

Saturday, November 8, 2014

November Stamp Club: Ornamental Pine


Here's November's project.  I love the Ornamental Stamp Set.  It is so realistic and beautiful!  I'm married to a tree guy so it's natural that I would like it.  


For the card you need:
Ornamental Pine Stamp Set
Old Olive (textured used here), Whisper White Cardstock
Old Olive, Real Red, Baked Brown Sugar, Gold Encore Ink
Big Shot with the Top Note
Stampin' Dimensionals

Not sure if you can tell, but the ornament is stamped one additional time on a separate piece of cardstock, cut out, and mounted on top of the original ornament on the Top Note with Stampin' Dimensionals.  And, the Baked Brown Sugar that was used for the pinecones are stamped on scratch paper first and then stamped on the Top Note so they fade into the pine needles.  


For our second project, we created a set of Love Notes.  Love Notes are 3 x 3 mini cards--great for gift enclosures, tags, or little notes you tuck inside lunch boxes of your loved ones.  

You will need:
Tag Talk Stamp Set
Old Olive (textured used here), Whisper White Cardstock
Old Olive Ink
Gold Metallic Baker's Twine
Label Bracket Punch
Stampin' Dimensionals 

Happy Stamping!  Bye for now, Maria

Saturday, November 9, 2013

November Stamp Club: Gift Bow Angel

Don't you love when you buy something, and it has more than one purpose?  Like the Gift Bow die!  Trolling Pinterest the other day, I saw the most adorable angel, and upon closer view it was made with the Gift Bow Bigz L Die.  ADORABLE!!!


The Gift Bow Angel was our project for November.  These are so easy to make!  Here's what you need....


To create the halo, punch Gold Foil Sheet with the 1 1/4 Circle first.  Then, punch that circle out with the 1 3/4 circle.  You will have a circle punched within a circle.


I left the angel's face blank, because I am not gifted in drawing--that's why I stamp!


Supplies used:
Mixed Bunch Stamp Set (Annual Catalog)
Gift Bow Bigz L Die
Gold Foil Sheets
Very Vanilla and Blushing Bride CS
Cherry Cobbler Ink
Linen Thread
Stampin' Dimensionals, Glue Dots, Tombo Liquid Glue

Punches:  7/8" Scallop, 1" Circle, 1 3/8" Circle, 1 1/4" Circle, and 1 3/4" Circle

These would be the cutest gift tags EVER!!!  And, they would like so pretty hanging on a Christmas tree.  Happy Stamping!  Bye for now, Maria

Saturday, November 10, 2012

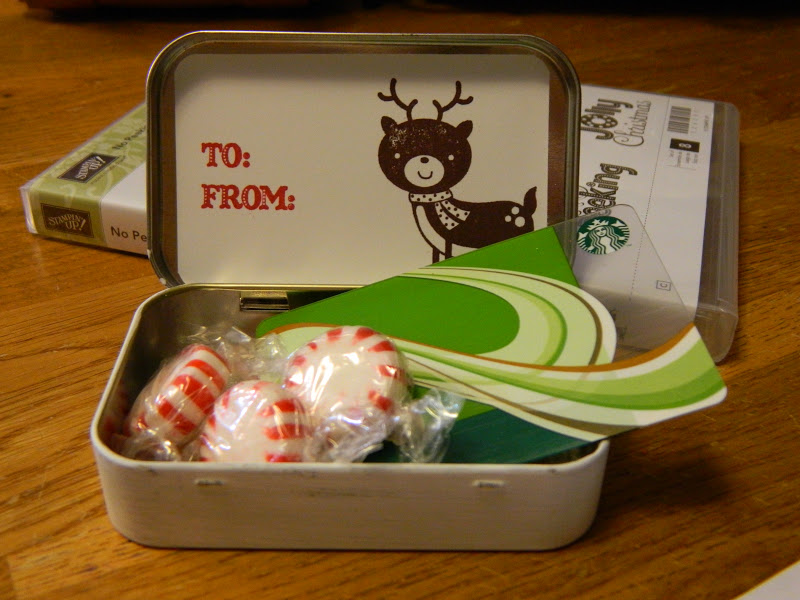
Altoid Tin Gift Card Holder


What's better than getting a gift card to spend on whatever your heart desires?  How about a gift card in an adorable holder upcycled from an old Altoid tin. 


After your done with your mints, clean up your tin and wash out the "minty" dust.


Paint the outside to cover up the words on bottom.  It took me about 4-5 very thin coats to cover it up entirely.  I left the top unpainted because I wanted to use the red trim.


To decorate, cut Candlelight Christmas DSP for the top to 3 1/4 x 2.  Round corners.  For the inside, cut cardstock to 3 3/8 x 2 1/8.  Round corners.  Stamp "to & from" and "reindeer" from No Peeking stamp set.  Fill as desired with candies and gift card.


For the belly band going around the outside, cut DSP to 8 x 1 1/4.


Happy Stamping!  Bye for now, Maria

Saturday, November 19, 2011

November Stamp Club

Hi Stampers!  Here's the project from November Stamp Club.  The background was done with a brayer.  When you ink up a brayer, you want to continually roll the brayer across the ink pad in a forward motion.  In other words, don't move the brayer back and forth on the ink pad.  If you just roll the brayer back and forth on the ink pad, you will have a spot on the roller that will not have ink on it.  Once you've inked up the brayer, NOW you can roll the brayer back and forth on your cardstock. 


I 'm using Pool Party and Basic Black Classic Inks.
Stamp Set is Uppsy Daisy.


I wasn't really digging the black so I changed it to Pacific Point, but I did stamp the Happy Birthday in Basic Black.  Base card in Pacific Point cardstcok is 8 1/2 x 5 1/2 folded in half--that's how I make all my cards.  That way you get two cards from one sheet of cardstock.  Middle layer is Basic Black (5 1/4 x 4) and the top layer is Whisper White cardstock (5 x 3 3/4).  Add a Rhinestone above the "i" for a little bling.


Here are the Rubber Duckie's card swaps form this month's club.  I've left off some names of the creators simply because I do not know who made what--so sorry!  Please let me know which one is yours so I can give you proper credit. 


Just Believe card by Barbara...Flower Garden Embossing Folder. 
Color with Stampin' Pastels over the embossed image.


Tina made this lovely Happy Holiday card using Snow Much Fun stamp set.


Barbara made this card using the Owl Builder Punch.


Frances and her daughter, Elizabeth, made this Christmas card using Loads of Love.


Thankful for...is made by Paige.  The swirls are actually embossed--very neat effect!


Mary made the "it's your day" card using the Great Day Simply Sent Kit.


Heather made this lovely round fold over card. 
It's hard to see from the photo, but the flowers were stamped with the Versamark ink pad.


Lisa made this Thanksgiving scrapbook page. 

Happy Fall!  Happy Thanksgiving!  Happy Stamping!


Sunday, November 14, 2010

November Stamp Club

Here's the cards from our monthly stamp club swap.  Aren't they wonderful?  Six of us made Christmas cards--that's six less I'll have to stamp this year!

Our project this month is a luminary using the Day of Gratitude stamp set.  Seveal of these would look nice on your Thanksgiving or holiday table.  They would make nice place cards or party favors for your guests.  They are super easy and quick to make. 
  1. Cut a piece of cardstock 3 1/2" x 10 1/4".
  2. Score at 2 1/2", 5", 7 1/2" and 10" (on the long end of cardstock).
  3. Punch desired shape from each section.
  4. Stamp on Vellum Cardstock.  Allow ink to dry and attach to the inside of luminary.
  5. Apply Sticky Strip to the 1/4" end tab and attach together to make square shape.
  6. Add battery operated tealight inside.
Supplies used:  Day of Gratitude stamp set, Pumpkin Pie Cardstock and Ink, Early Espresso Ink, Decorative Label Punch, Cardstock Vellum, battery operated tealight.


This luminary is slightly smaller than the one above.  Cut cardstock to 3" x 10 1/4."  Stamp prior to scoring using the same measurements as above.  
Supplies used:  Marina Mist Cardstock and Ink, Snowflake Punch.

Happy Stamping!  Bye for now, Maria